My current favorite is called "Tempo"
it is a free App at the Apple App store

This simple study is something I learned a long time ago (1966-67) from watching studio drummers Jim Gordon, Jim Keltner and John Guerin perform at various clubs here in Los Angeles backing up Singer/Songwriters.
This was right before British musicians like Eric Clapton and Joe Cocker arrived in Los Angeles and started hiring them for their bands and recording projects. So I was able to sit very close and observe what they were doing and this simple right hand lead fill with or without the left hand added in for spice was something they all used.
These drummers are highly regarded for their time and feel in their playing
so why might they be doing this, just lead with the right hand?
If you think about it, your right hand is already keeping time on the Hi Hat
so why break up that feeling and motion of the time, just change where you are placing it. Beauty in Simplicity, the mark of an artist.
Once you start listening for this you will notice it is in every Style of music where drummers play 8th Note Time on the Hi Hat. The exercises are notated for snare, high and low toms,
but they work just as well on high, mid and low toms. When adding in the left
hand those 16th notes can be played as written, evenly in time or given a little swing in their placement for a little looser feel.


All over Youtube I see videos on how to play the snare drum teaching the old concepts of Full, Half & Tap strokes as the way to gain Dynamic control of the sticks. Practicing playing at these 3 different heights as starting points, will teach you how to play Loud, Medium or Soft.
If you plan on being a marching drummer or drumming is just a hobby, this 3 level technique will probably be OK. But if you are serious about being a good musician you will soon encounter the fact that music is played at 10 dynamic levels not 3.
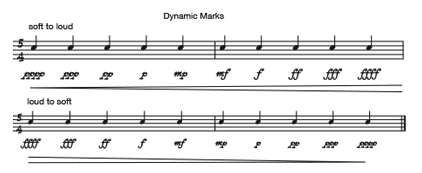
As you can see from the above example there are 10 dynamic markings used in notation and you are expected to know what they mean and how to play them. Instead of holding the stick at the 3 different starting Heights of Full, Half & Tap strokes Try starting with the stick at 1 inch above the drum and then raise it to 10 different Heights from the 1 inch starting position. The higher and faster you raise the stick the louder the strike becomes. Starting low gives you a 45 degree range of motion and 45 dynamic levels are now available to you instead of Three
.There is a lot of INFO on the internet about drum technique and
what is correct and the best way of doing things.
As you can see from the above example, sometimes that INFO
is just old, repeated misinformation based on drum ideas from the 19th century.
I find having 45 degrees of dynamic motion better than Three and if you
experiment a little you will probably discover like I did that the old way
of learning to play with dynamics is actually quite limiting.
G x M = F
Gravity times Mass = Force
Why do so many drummers fight against gravity and anatomy and adopt technical methods that ultimately defeat them from reaching their drum playing goals?
Your response is probably, what the ****! is this guy talking about? All over social media I see Drummers discussing technique and many of them demonstrate the Sanford Moeller or George L. Stone methods of playing. They all seem to play pretty fast and loud. Then there are drummers who play with their fingers using Tympani grip and they play very fast but not with much power and using only fingers limits their ability to play accents among all those fast notes. These methods all work to play the drums and many successful drummers use them in their playing.
Sanford Moeller and George L. Stone started as marching drummers and witnessed the creation of the drumset, and played in the early dance bands of their day. Their background playing marching snare drum lead them to their ideas about technique. They grew up playing on calfskin drumheads. I doubt any of you have ever played on a marching drum with calfskin heads so you have no experience with what it feels like and why Sanford Moeller and George L. Stone used the techniques they employ. When you play on calfskin heads you quickly learn that the slightest change in the weather will change the drums tuning and if there is any moisture in the air the drum will drop in pitch and lose it's tension and now you are playing on what feels like a wet towel. Being able to over come this and still be able to get the drums to project was one of the reasons for Moeller and Stones methods along with the visual effect of a drum line moving their arms in unison.
There is another method of playing the snare drum that grew out of the N.Y. Broadway show drummers. This method was employed by Billy Gladstone and Murray Spivack who were the highest paid drummers on the New York scene during the depression era. During this period Billy and Murray had a teaching studio together along with mallet virtuoso George Hamilton Green. I never heard or studied with Billy Gladstone he passed in 1961 before I had taken up the drums but I was fortunate enough to study with Murray. Murray told me that he and Billy's technique were based on the methods used by Swiss, French and Italian orchestral drummers of the previous century. In numerous interviews Buddy Rich has said that he learned technique by watching Billy Gladstone play and that he used a wrist based method, Louis Bellson on the other hand also says he learned by watching Gladstone and that he employed a finger method. Now what, who is correct? Buddy Rich and Louis Bellson were both phenomenal drummers so what is correct wrists or fingers?
Maybe I can offer some clarity on this discussion by sharing some of the basic concepts Murray taught all who studied with him. First I want to give you a little background on Murray. Murray was hired at RKO Pictures at the dawn of the movie era as a sound engineer and he invented many of the common techniques of audio manipulation used today. He once told me that he created King Kongs roar by layering four animals sound together and running them at altered speeds and two of them were run backwards. All during his career as a sound engineer he was here in Los Angeles teaching many of the working Jazz and Rock drummers around town.
One of the first things Murray tells every student is that you must
allow gravity to assist you not fight against it.
His statement "UP to Come Down" is the fundamental motion
for playing. He would demonstrate what he called the floor which is the start and end position
of every stroke. The wrist turns up to raise the stick and then gravity is allowed
to pull the hand
and stick back to the floor. This is the total opposite of Moeller
and the marching drummers who all
play what are called Full Strokes that start and stop in the air.
Stopping up in the air is a visual
technique that looks cool when a drumline does it together,
but it is not very efficient if you stop
and observe human anatomy and how our bodies
move against gravity in the most efficient manner.
When you walk or run you are observing Murrays rule of "UP to Come Down".
When you walk or run
you are pushing your body weight up and forward and as fast
as you do this gravity returns you to the
ground, you do not stomp your feet
into the earth to move faster. So hitting the drum with more
downward force
is not the most efficient way of moving the stick or increasing speed. When you shove the stick
down like this you get the illusion
that you are faster, but what really is happening is the drumhead
is working
like a trampoline and throwing the stick up in the air
so you do get a slight speed boost, but then
you quickly encounter the tension
in your arms and shoulders that catching the stick to throw it down again creates and you will hit a point
where the
tension destroys your endurance and you will not be able to maintain
this speed for very long.
The simple truth is everything on earth must
move up to come down so making use of gravity is important
to play the drums.
Athletes lift weights UP and Down to build muscle so playing Rudimental Full
strokes which
move Down then Up will never build your wrist muscles as your
not moving them against the pull of gravity in an
efficient manner.
You naturally have enough muscle strength to throw a couple of grams of wood
down into the drum, but learning to isolate
your wrist muscles and make then lift "up to come down"
will over time build new muscle and that is the only
way
to get faster than you natively are.
Now back to the issue of wrists or fingers. Murray solved this issue by placing the fulcrum in the middle finger in the right hand and then showed how the natural motion of the wrist forced the fingers to move in response to the wrists motion and position, and how this influenced rolls and rebounds as you played. He showed me how the motion and position of the wrist would to the eyes give the impression that the fingers were moving the stick, while in reality it was the fingers responding to and following the motion and position of the wrist. Then he demonstrated how the Left Hand in Traditional grip worked the same way but sideways. There it was, the same motion I had seen and heard Buddy Rich and Louis Bellson use and Murray was probably 80 years old and his rolls and rudiments were clear and precise.
Murray had a set order he taught the rudiments in and this order along with specific motions for each rudiment ingrained these motions into your muscle memory. This ordering of the Rudiments arranges them so the motions you are learning progress from simple to complex. In it's simplest form, he taught three motions, that allow you to master all the rudiments. Single Strokes, Rebounds and a combined motion he called the Up and Down Stroke. Once you feel these motions, playing and improvising with rudiments and sticking combinations becomes easy and physically effortless.
This method of playing the snare drum is explained in great detail
with lots of examples and exercises in my Apple Book
The Essential Rudiments of Drumming
Watch YouTube Video #1
My First Lesson with Murray SpivackDownload First Lesson Notation
Music Examples from VideoWatch YouTube Video #2
The Roll Chart (What it is and how to practice it)Download Roll Chart
Roll Chart NotationWatch YouTube Video #3
Difficult Rudiments? - 4 Stroke Paradiddle & Flam ParadiddlediddleWatch YouTube Video #4
The Up & Down Stroke/Throwing the WeightWatch YouTube Video #5
The Ruff, The Tap Ruff and a Rant about RollsWatch YouTube Video #6
Paradiddles - Stick Control - Multiple Rebounds - Cymbal TimeWatch YouTube Video #7
What I learned from a Child ProdigyWatch YouTube Video #8
Grip-Rebounds-Inversions-TimeWatch YouTube Video #9
32nd Note Time - Answered Questions - Flam RudimentsDownload Answered Questions
Answered Questions/Basic StrokesDownload Notation for 32nd Note Time
Triple Paradiddle Pyramids